Hi! Tony here. Some of you have asked about our podcast set-up so we wanted to take the time to share with you the basic equipment we use.
Before we dive in, it’s important to note that this post is not meant to be exhaustive of all of the things you could use to create a podcast and it certainly does not intend to claim that this is the best set-up for running a podcast.
This is simply a post about our current podcasting set-up and why we’ve chosen to use each part. It answers the question of “What equipment do you use for your podcast and why?” It is not how we use our gear or about podcasting strategy in general. If you’re interested in learning more about those things, we’re planning a podcast workshop in Asheville this coming year. Be the first to hear about it by signing up for our workshop mailing list.
We hope this overview of the podcast equipment we use is helpful for getting started if you’re considering launching your own podcast.
*Please note that for your convenience we’ve added links to the products we use for the podcast. Some of these links are Amazon affiliate links. That simply means that if you purchase an item through a link listed on this post, we will earn a small commission off the sale.
How We Chose Our Podcast Equipment
When we decided to launch a podcast, I took a deep dive into all of the gear necessary to run a podcast. And you should know something about me: I love gear. I love reading about gear. I love watching YouTube videos about gear. And yes, I love buying new gear.
But when it came to researching how to make a podcast, I quickly became overwhelmed — well maybe not overwhelmed but I was most certainly whelmed.
Audiophiles have a funny way of talking about frequencies and hertz and stuff you and I simply don’t have experience with or care about. So attempting to learn about what gear you need can quickly slip into a thesis about soundwaves and decibels and things you need a dictionary or degree to understand.
So it took me some time before I was able to make sense of some of the articles, YouTube videos, and conversations I had with friends. But eventually, I landed on a very simple podcast set-up —which I’ll explain in detail below— that works wonderfully for us here at the Making It in Asheville Podcast!
The set-up we use has a combination of high-quality and affordable components, as well as an impossibly simple-to-use technology. All of these pieces of equipment combine perfectly to allow us to record interviews with up to four total people on location, churn out a single episode per week, and not pull our hair out in the process.
Our Basic Podcasting Set-up (It’s Simple, I Swear)
I don’t pretend to have gone to school for audio-engineering but the way I think about podcasting equipment keeps it simple. You’re welcome to think this way, too.
You’ll need to consider five different categories of “things:”
- The Recorder – How will you record and save the audio?
- The Microphone(s) – How will the device that saves the audio hear it?
- The Audio Editor – How will you edit and improve the audio after recording?
- The Hosting – How will you share it with the internet?
- The Miscellaneous – What other things will add to the recording and listening experience?
Let’s dive into each of those below.

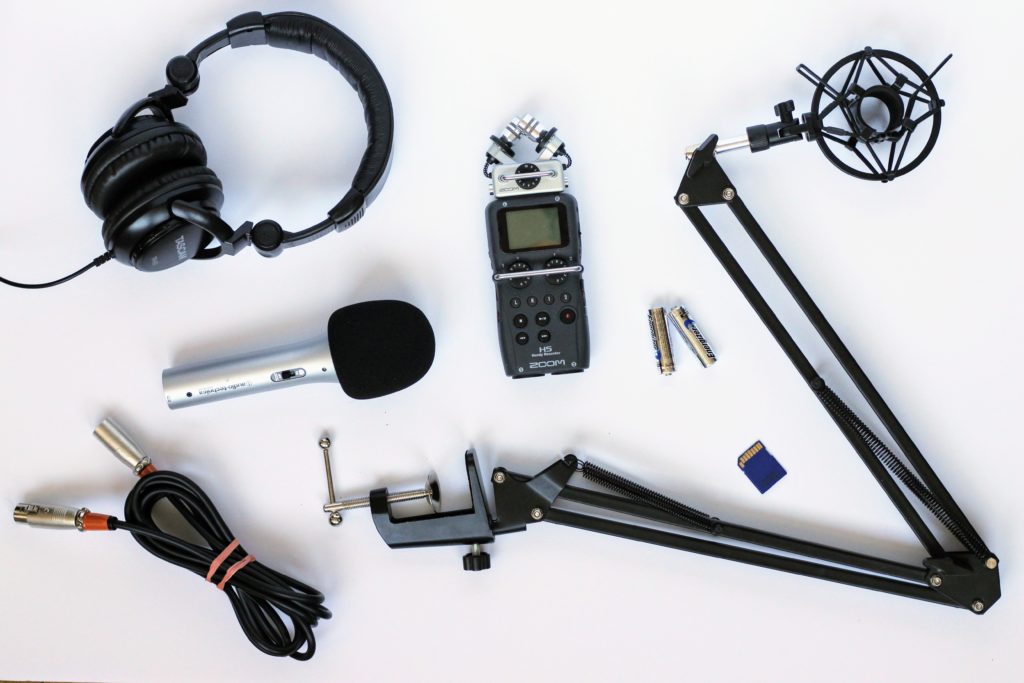
The Recorder: Zoom H5 ($250-$400)
The recorder is a device that records and saves the audio to your memory card.
You can’t look up podcasting equipment without seeing Zoom recorders in the results. I’m sure there’s a good reason for it. Everyone swears by some version or another of a Zoom recorder for its mobility, ability to record multiple tracks, and relatively high-quality output, all for a moderate price (relative to some recording setups).
Multi-track recording is a big deal. It means that Sarah’s, our guests’, and my audio are all recorded separately. This allows me to edit each of them on their own (i.e. increase Sarah’s relative volume or pull out a sneeze that only my microphone hears). Multi-track recording is an essential element of building a professional sounding podcast.
If you want a multitrack recording, Zoom has you covered. We narrowed our options down to two: the H5 and the H6. The primary differences that I noticed between the Zoom H5 and Zoom H6 were the number of recording tracks and the price. While there seemed to be no difference in recording quality, the H5 said it could record up to four tracks while the H6 could record up to six. The price difference was rather substantial for the new H6 models vs a new H5.
Because we only expected to interview up to two people (and therefore need four tracks in total), we opted to start with a refurbished H5 that came with a bundle of other gear. The bundle allowed us to limit our overall investment and allowed us to prioritize getting started. The thought was, if the podcast grows, we could always get a “better” (or bigger) recorder.
What we didn’t realize was how the Zoom H5 calculated the four tracks. The H5 has inputs for wo external microphones and one microphone built into the recorder which records in surround sound (or a right track and a left track) for four total tracks. As such, our first couple of interviews used a boom mic to record our guest’s audio (the boom was a part of the recorder bundle we purchased).
To allow for four total microphones, we actually needed to buy an additional component that converts the on-recorder microphone into two additional XLR inputs.
In hindsight, we could have opted to purchase a Zoom H6 out of the gate, which has 4XLR inputs standard plus the onboard microphone that records in two tracks.
OUR PICKS:
Zoom H5 Four-Track Portable Recorder – If you only need to record with up to 3 people
Zoom EXH-6 Dual XLR/TRS Capsule – To convert the onboard recorder into two additional microphone inputs and turn H5 into a 4-input recorder and the H6 into a 6-input recorder
Zoom H6 Six-Track Portable Recorder – If you want to record with 4 or more people

The Microphones: Audio Technica 2100 (~$60/each)
After spending what seemed like a lifetime reading about microphones, I can say that I still don’t fully understand the science and what makes one better than the other. But here’s what I did retain.
Generally speaking, some mics are great for recording studios while others are great for stages. The studio mics hear EVERYTHING in just about a full 360-degree range. Stage mics are directional. They work like a sound tractor beam and are at their best when you’re speaking directly into them.
Because we do not have a studio and we were planning to record on location, we went with “stage-style” mics. These mics are great and can be found as part of cost-saving bundles with miscellaneous other equipment you might want to consider picking up — think mic stands, headphones, and more. We discuss some of those below in the Miscellaneous section.
OUR PICK: Audio Technica 2100 Microphone – These are often offered in cost-saving bundles. We discuss one of them below.
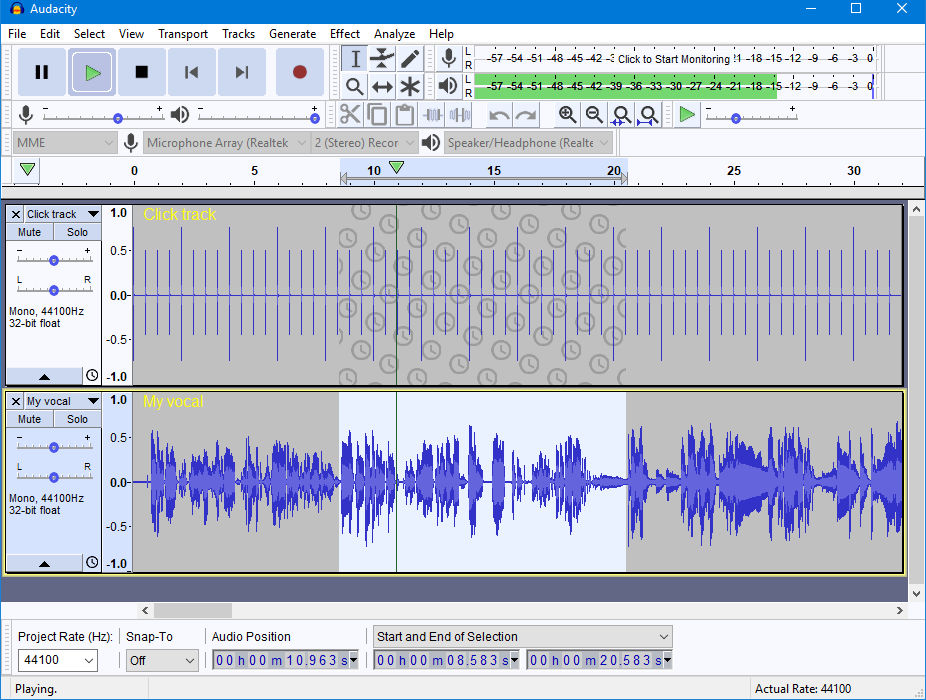
The Audio Editor: Audacity ($0)
While you could certainly record a conversation and send it directly to the world, it’s wise to make a pit stop at an audio editor before you do. This is where you can cut and splice intros, outros, advertisements, and pull out any hiccups or annoying background sounds.
Audio engineering can be daunting. I watched videos on just about every technology out there and decided to move forward with Audacity, a free audio software.
While Audacity is not as intuitive as our hosting product (up next), there’s only a couple of steps we take to polish our podcast before publishing. The steps are relatively easy to learn and fast to execute. We may eventually switch to a paid audio editor at some point, but for now, the free version of Audacity works just fine and we’d recommend it for anyone who is just starting out.
OUR PICK: Audacity

The Hosting: Pinecast ($0-$10/mo)
It’s one thing to record a podcast, it’s another thing to get it onto the internet and have it show up everywhere people want to listen to it. At its core, the “getting-it-to-show-up-where-people-listen” is part of “hosting” a podcast.
Most experts advise hosting your podcast separate from your main website (for reasons like “hosting it on your site could drastically slow down your website”) and luckily there are a lot of podcast hosting solutions out there. After some searching, we went with Pinecast.
Honestly, I don’t remember what made me pick Pinecast initially. I remember reviewing about five all-in-one solutions and thought that the free product’s setup, user interface, and paid pricing tiers of Pinecast were the best.
And we’ve been very happy with that decision. The podcast set-up and publishing process could not be simpler. After taking a couple of minutes to do the initial set-up, all we have to do now is just drop the audio file into a new episode page, update the descriptions, and moments later the podcast is live across the internet.
Again, one major benefits of Pinecast for new podcasters is its simplicity and that it’s free to host your first 10 episodes. After our first 10 episodes, we started paying $5 per month —a subscription fee that is well worth the convenience.
Here’s a referral offer we’ve taken from our Pincast account page: “Start your own podcast for free, no credit card required, forever. If you decide to upgrade, use coupon code r-2f50bc for 40% off for 4 months, and support the Making It In Asheville Podcast.
OUR PICK: Pinecast
The Miscellaneous: Other Handy Podcast Tools (Various Prices)
Beyond the primary bits of equipment, there are some other odds and ends you’ll want to consider as you’re getting started.
Memory Card (~$12)
Memory is one of those technology areas that expand exponentially almost every year. The cost of a 1 terabyte hard drive less than ten years ago would have made your head spin. Today, you can get one for less than $100. Memory and storage will almost double in capacity and half in cost yearly.
With that, buy whatever size memory card you think you’d need or want. And just know that next year it will be radically cheaper to get that same card than this year.
We recorded all of our first 26 podcasts on the memory card that came in our recorder bundle. It only had 4 gigabytes of memory, which is about 8 hours of high-quality 4-track recording. It’s a perfect size if you’re diligent about exporting the recorded audio and reformatting, or wiping the card, after each episode. And a 4gig memory card costs almost nothing.
For context, the 64 Gig memory card we link to is under $12.
OUR PICK: 64 Gigabyte Memory Card

Batteries (Prices Vary)
Our recorder only has four levels of battery: full, two bars, one bar, and then…poof! The recorder turns off. In one interview, our recorder dropped from full to completely dead. Luckily, we had extra AA’s in our bag!
Since then, we’ve exclusively used Lithium batteries and always carry more in our bag. I’m not sure of the science behind it, but lithium batteries last a substantially longer time than standard batteries. They are, in my opinion, the best battery option for podcast recording because the last thing you want is for your batteries to die in the middle of an episode.
OUR PICK: Energizer AA Lithium Batteries

Tripod ($60)
When we record, we mount the Zoom H5 recorder to a tripod so that I can easily watch the audio levels and make tweaks without having to break too far from eye contact with the guests and Sarah. It’s not a required accessory for a podcast—it’s actually something we bought for video and photography—but it’s one that I love and I’ve used for every episode.
OUR PICK: Manfrotto Compact Tripod

Foam Mic Covers (~$1)
The internet told me that adding a foam cover to the microphone would improve the recording quality. For about $1 per mic, I took the chance and I’ve been very happy with the results. It works something like a windshield for your “puh” and “shh” sounds.
OUR PICK: Onstage Foam Microphone Covers

Mic Stand/Boom Arm ($49.99)
To be clear, you don’t need a stand at all. One of the most popular interview podcast hosts and his guests hold their own microphones.
But still —our boom arm mic stands are probably my favorite part of our set-up. They allow us to take notes during the podcast, sit almost anywhere, and talk with our hands (which I love to do). Stands also help to keep the mics close to the mouth, which is essential for high-quality audio. Our mic stands use a simple c-clamp and have been clamped onto tables, arms of chairs, and more for our podcast. We highly recommend them so long as you also get the shock mounts we list below.
OUR PICK: Knox Gear Boom Arm

Shock Mounts ($19.99)
Not all mic stands are created equal. The key, as it turns out, is that the stands have what is considered a “shock-mounting system.” This means that the microphone is effectively supported in a web of bungee cords. A shock mount limits the transfer of energy through the mic stand itself and into the mic.
Again, I am not a sound engineer. But traditionally, any time you tap a mic stand or the table a mic stand rests on, a sound wave passes through the stand into the microphone and gets recorded in your audio. Sounds that you would never notice while talking with your guest can get picked up by the microphone and could ruin an otherwise great audio recording.
Shock mounts limit the effect of sound transfer and the likelihood that you record a podcast that, due to tapping, clicking, or humming sounds, becomes impossible to listen all the way through.
OUR PICK: Knox Microphone Shock Mount
***As a side note, we actually bought this Audio Technica Bundle which includes the above Audio Technica Microphone, Knox Gear Boom Arm, Shock Mount, and Pop Filter for under $100. Even though we don’t use the pop filters, we saved a few bucks by choosing this bundle.

Headphones ($16+)
The other tool that helps limit the risk of recording unexpected and bothersome sounds are over-ear headphones.
If you’ve ever seen a photo or video of a radio host, they almost always have headphones on. Rockstars almost always have in-ear monitors. And it’s the same reason you should wear headphones when recording: you need to be able to listen to live playback to know what’s actually happening in your recording. This is perhaps the only way to ensure a quality recording without waiting until you get home to upload the audio file to your computer player.
Headphones are their own black hole of audiophile blog posts and information. The pair I bought was about as cheap of a pair as was available and I’ve been very happy with them for both recording and editing our episodes.
OUR PICK: Tascam Over-Ear Headphones
Setting Up Your Own Podcast
Here’s the thing: the most important thing you can do for your podcast is to start it. Gear doesn’t matter all that much. Our first episode was recorded directly into a 2011 MacBook Pro. You can bet it sounded pretty bad. But we started.
We continued to record, learning more about gear as we went along. In fact, so much of what we know now about podcast equipment, we learned from making mistakes (like letting the batteries die during an episode). With every single episode, we get better and better and I guarantee you will, too. But you have to press record first.
Want to Learn More About Starting a Podcast?
If you have any questions about how to start, ways to grow, or why you might what to consider launching a podcast — you might want to click here. We’re planning to run a How to Podcast Workshop in Asheville that will cover those exact questions and more.